
There’s just something about tackling it yourself, right? In this guide, Taylor will walk you through how to create a homemade duck call. Who knows, you might have just the touch to bring them in the next time you’re out in the field hunting.
I’ve done my fair share of duck hunting, though I never called ducks myself. I had buddies who were well rehearsed and could bring the birds in as if they were ducks themselves. As for me, I was always more concerned with not scaring ducks away than I was with trying to blow a call. I know calling is an art, that’s why I’ve wanted to leave it with the artists until I was sure I know how to call right.
I do, however, like to build things. So when I started to learn how to make duck calls, it was time to jump in and start on my own calls.
Duck hunting has become more popular in recent years due to television shows like Duck Dynasty and interest in DIY duck calls rose along with the sport’s popularity.

How to Make a Duck Call
We’ll go through the steps below so you can put together your own custom, homemade duck call. But if you’re a visual-type, you can get a good idea about what steps are necessary by taking a look at this video:
Components of a Duck Call
Modern duck calls, specifically the Louisiana style one I made, have 5 main parts and each has a primary function:
- Barrel
- Insert
- Tone Board
- Reed
- Wedge
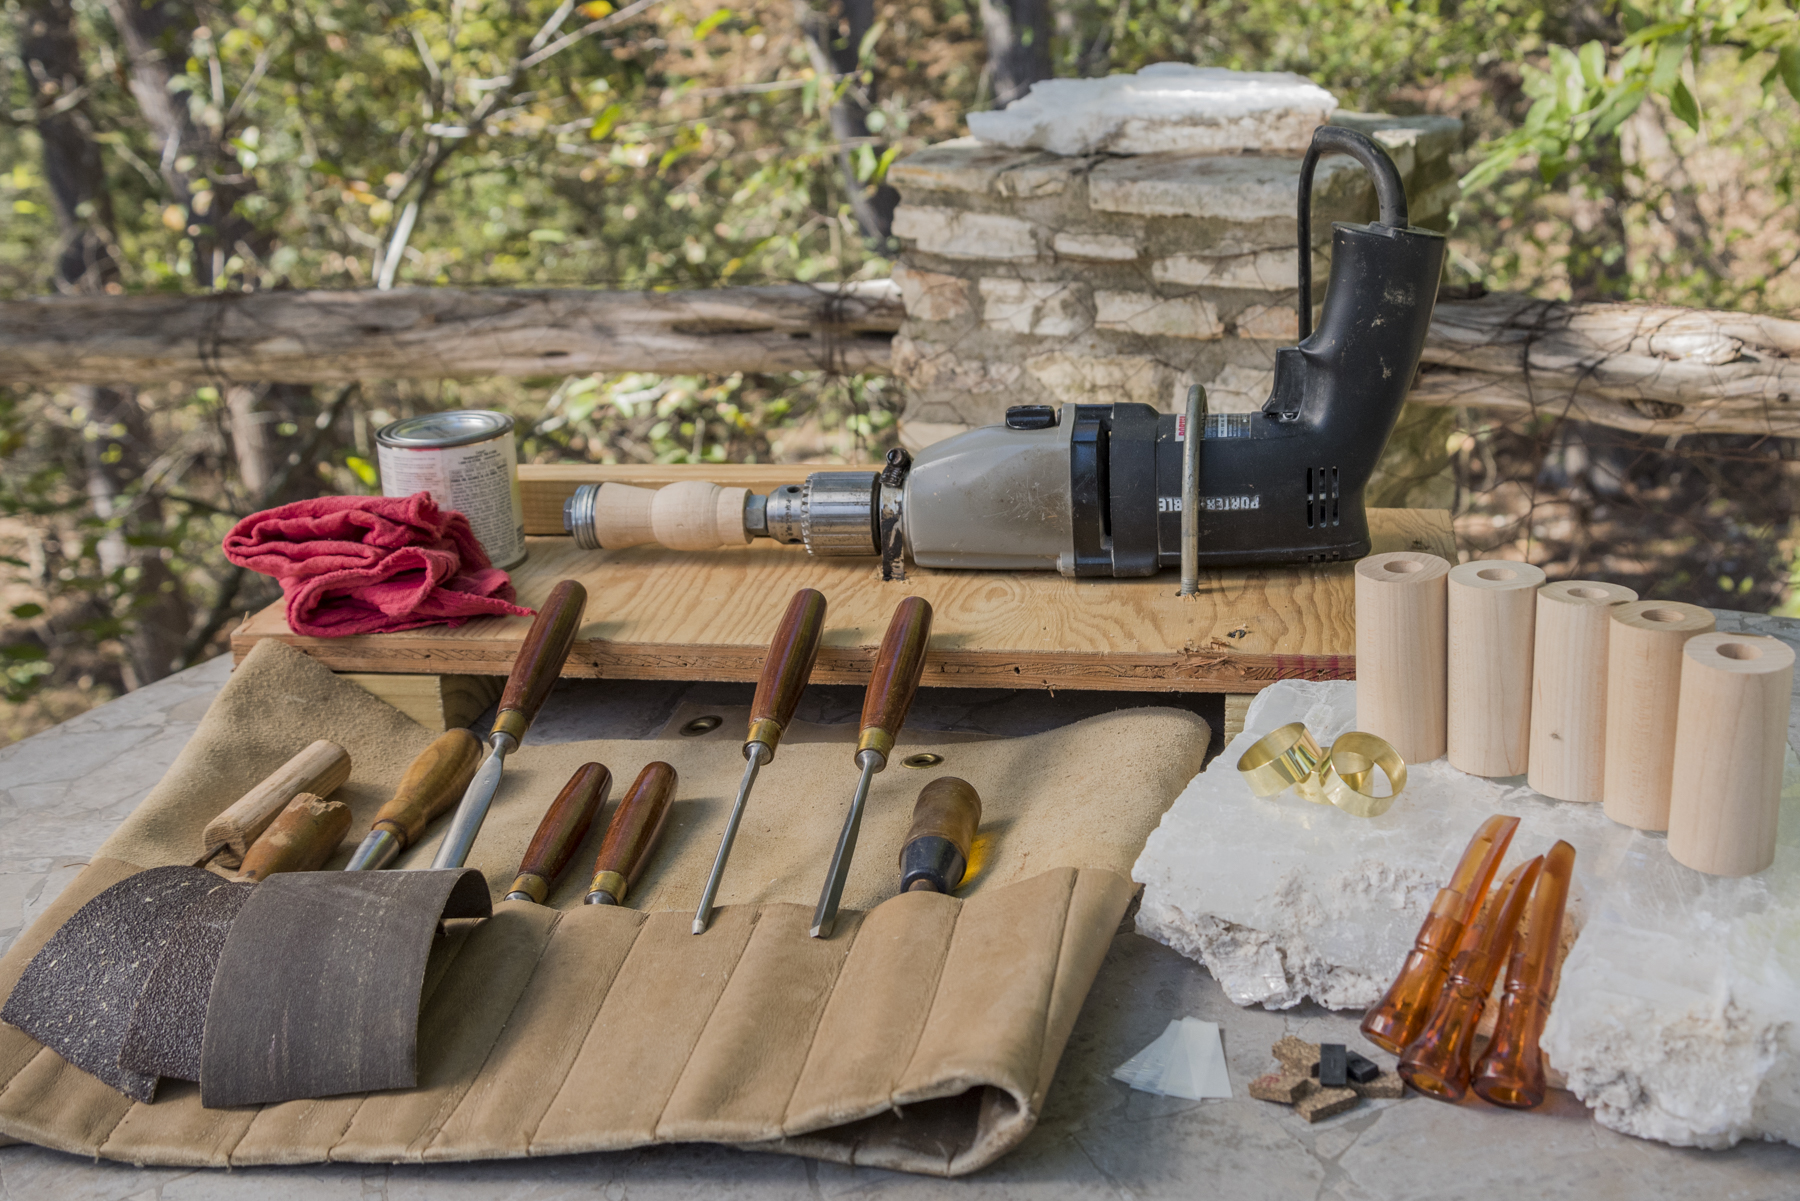
I found that there are several kits and materials on the market for beginner and advanced DIY duck calls. Etsy and Ebay seemed to have the biggest stock of materials, while there were also dozens of smaller retail website suppliers as well.
Duck Call Barrels
The barrel acts as the duck call sound emitter and handle. Generally, it is a piece of wood that the duck call maker can mold artistically.
The length of the duck call barrel and the hardness of the wood affect the sound, but you can lathe the outside to your own design. The barrel generally has a 5/8 bore through the center, so it can accept the insert and tone board and emit the sound from the other end.
You can shape either a block or cylindrical piece of wood, known as a “blank” for the barrel. This is generally done on a lathe. The lathe turns the blank while the woodworker uses “turning tools,” similar to chisels, and holds them against the blank to shape it into the desired finished product.
No Lathe? Here’s An Alternative
After re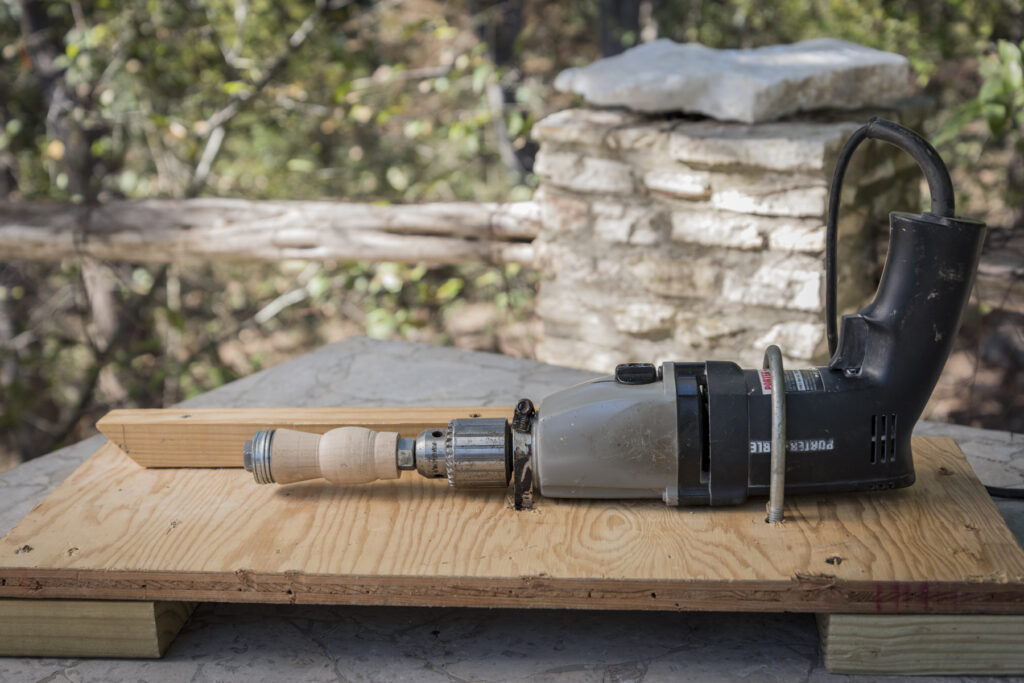 searching how to make my own duck call, I was ready to start. But I didn’t have access to a lathe, so I built one myself using an electric drill.
Here’s what I did, in case you’re in the same boat and need some inspiration:
- I mounted a corded drill upside down to a wooden base; using only materials I had lying around. This drill had a trigger lock, which was necessary to work with both hands.
- I first placed a half-inch bolt in the drill and then tightened the bolt into the drill mount and secured it in place with the drill chuck.
- I leveled the drills mounting brackets, so that the bolt was level. This bolt would act as my mandrel, or shaft that would be used to hold and turn the blank. I had to use a half-inch bolt, as a ⅝-inch bolt would not fit in the drill bit mount.
*Note: The lathe substitution I am sharing with you in this article is based on my years of experience doing carpentry and working with power tools. If you feel unsure of your skill level in working with carpentry tools, please consult a professional. Do not risk injury for impatience.
- After leveling, I took the bolt out of the drill and slid a blank barrel onto it. Then, using washers, tighten the nut into place, making sure that the blank was centered on the bolt to prevent wobbling.
- I then turned the drill on to check the rotation of the blank and make sure it didn’t wobble while turning. The blank appeared to turn evenly, without wobbling, and the speed appeared to be good as well, so I pulled out the turning tools and gave it a shot. Sure enough, it worked!
Also, because I didn’t have a proper lathe, I knew that a square shaped blank might cause some problems when it came time to press turning tools up against the turning wood. Thus, I ordered seven round maple turning blanks at 1.5in thick, 3” long, and with a 5/8” pre-drilled bore hole through the center, so that I didn’t have to drill the hole myself. I figured it was best to order more blanks than I planned on making duck calls, in case I destroyed some along the way, also if everything worked as planned, I would have multiple models for different call types.

 Constructing Your Duck Call


 Constructing Your Duck Call
There are six basic steps for making your own duck call, after acquiring or constructing a lathe.
1) Lathe Barrel
2) Sand Barrel
3) Stain Barrel
4) Trim Mylar Reeds
5) Mount Reeds with Wedge on Tuning Board
6) Mount Brass Ring and Tuning Board onto Barrel
I began lathing and turned my first raw barrel blank in about 15 minutes. I had some work to do on my technique, but overall the blank came out smooth.
The shape I picked was inspired from some shapes I found online, but the design for the call is open to interpretation. I wanted to add a brass ring to my duck call to give it some style.
In order to mount the ring I had to make sure the area of the barrel blank where the ring would be mounted to match in size, so it would fit securely. In order to do this I lathed the area on the blank where the ring would go, then test fit the ring, alternating these steps, until the ring fit perfectly.
I didn’t mount the ring though, as I first needed to finish making the barrel.
After making sure the ring fit, I switched over to sanding the barrel while the lathe was still spinning. I used three different grits of sandpaper, starting with the lowest and working my way to highest, in order to get the smoothest surface possible. This took about 5 minutes. After sanding the blank barrel on the lathe, I hand sanded it to fix any final blemishes that needed to be made.
I then used a simple stain on my duck call barrel. I didn’t have to stain it and could’ve used an oil/sealer instead to darken and color the wood. If you are going to stain the wood, pick the color of your choice, and test the stain on a barrel blank before lathing, so you know what method and how many coats to apply, before staining a finished barrel. Just like staining anything, a few coats should be applied with high grit hand sanding in between coats in order to obtain the desired shade and to work the stain into the grain.
After staining, oiling, etc. I moved on to building the insert and tuning board. These inserts/tuning boards can be made of wood on a lathe as well. But for my first duck calls, I wanted to be sure to have the right sound, and make my first DIY duck call project any more difficult. So, I ordered polycarbonate-tuning boards/inserts directly from Etsy. These pre-made inserts were tuned and had a reputation for making a good duck call. There are tons of manufacturers and different tuning for these inserts; the choice is up to you as to which one you need for the type of duck you are calling.
Tuning Your Homemade Duck Call
Besides these insert/tuning boards I also ordered mylar strips that work as the reeds. You’ll also want to pick up cork and rubber pieces to mount the reeds. Mylar is a commonly used material for duck call reeds. To create the full insert, I first cut the reeds to a length that I believed would make the sound I was looking for.
Next, I trimmed the two corners of one end of the strips. This helps to tune the reeds’ sound. I did this for two reeds, as a double reed insert was the specific design I was making.I determined how best to trim my double reed duck call based on advice from Rod Haydel of Haydel’s Game Calls in an article featured by Ducks Unlimited.
“Haydel says if a double-reed call is hard to blow, the reeds can be trimmed very slightly or simply pushed back toward the end of the call. “This adjustment may also raise the pitch and create an unbalanced call that won’t produce a full range of notes,” he adds.
“To compensate, you may need to push the wedge back slightly to lower the pitch to a comfortable, balanced level.”
“To add rasp to a double-reed call, Haydel says you should offset the reeds so the tip of the top reed is pushed back 1/16 to 1/32 inch from the tip of the bottom reed.
“When tuning any call, always make very slight changes and then reassemble the call and test it,” Haydel advises. “It doesn’t take much of a change to make a big difference in a call’s sound.”
After tuning (trimming) two reeds, I placed them onto the tuning board. I then took a small rectangular piece of rubber and wedged the reeds into the tuning board mount. Making sure the reeds, were straight, and secure, I took the insert/tuning board and placed it into the end of the barrel I ended to mount it. This was merely a test mounting, as I first wanted to get the brass ring fully mounted onto the barrel.
There are a lot of different methods to adhere the ring to the barrel. For example: small pins driven through the brass into the wood and glues. I decided to use epoxy, something I knew would permanently adhere and that I read worked great on duck calls. Following the epoxy instructions, I carefully mounted the brass ring to the barrel.
 After making sure everything with the barrel and insert/tuning board was finalized, I placed the insert into the barrel. Then I blew my duck call for the first time. The sound was really good, mostly due to the tuning effort put into the insert.
From here, I knew I would still need to work with the duck call tuning. I would need to trim the reeds to different lengths and the corners of the reeds to different sizes, in order to obtain the desired sound for the duck I intended to call.
Making my own duck call was not only a relaxing way to spend my afternoon, but it has also helped me better understand duck calls and techniques for calling. I am confident that this exercise will improve my duck hunting as well as yours.
Have you made a call before or has this guide inspired you to try it? Have any tips we should share? Let us know below!