Do conventional zeros still work with short barrels and tall optics? Below, we’ll cover the two primary zeroing approaches, the platforms each one fits best, and how our AR-15 Rifle Zero Tool can help you choose a zero optimized for your exact setup.
Sighting in a rifle is one of the most misunderstood steps in shooting. Whether you’re learning how to sight in a rifle for the first time, zeroing a red dot for the range, or dialing a scope for precision shooting, the goal is the same: establish a zero that actually matches your rifle, optic, and intended use.
For shooters who want an immediate answer without working through all the variables, you can determine your optimal zero right away using our AR Rifle Zeroing Tool, which calculates the correct zero based on your specific setup.
This guide shows you exactly how to establish a rifle zero with a red dot or scope step by step—and explains how to choose the correct zero for your configuration when generic, one-size-fits-all zeros fall short.
What Does It Mean to Sight In a Rifle?
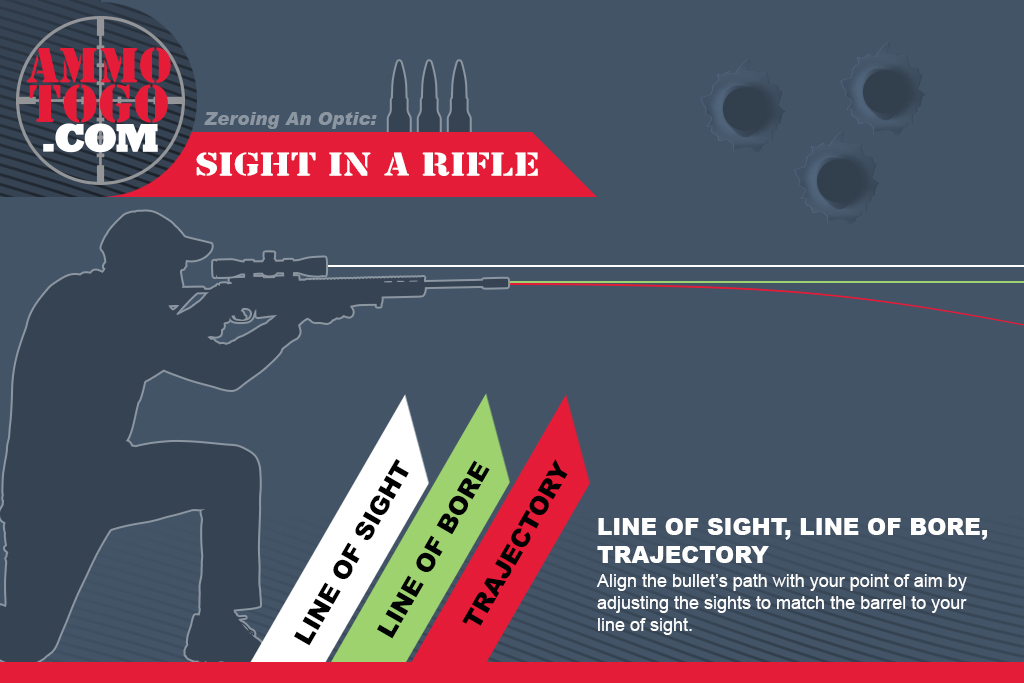
Sighting in a rifle—often called zeroing—means aligning your optic so that the point of aim (POA) matches the point of impact (POI) at a specific distance. When a rifle is “zeroed,” bullets strike exactly where the reticle or dot is aimed at the chosen zero distance.
Your bullet leaves the muzzle angled upward. This upward angle allows it to intersect your line of sight at the zero distance. The reason the bullet has to travel upwards is because your line of sight (LOS) is elevated above your bore and the two need to intersect which is your zero point. Imagine that there are two centered invisible lines; one going through your optic (optical axis), and the other is going through the barrel (bore axis). Your optical axis is higher than your bore axis. Zeroing adjusts the optic so its line of sight intersects the bullet’s trajectory at a specific distance. The bullet then will continue traveling upwards until it reaches its max ordinate (the highest point in the arc) until it start falling back down towards earth. The bullet travels upward relative to the line of sight, not upward relative to gravity.
How to Sight In a Rifle (Step-by-Step)
How you sight in your rifle depends on your objective. In practice, nearly all zeroing strategies fall into one of two categories:
(1) a precision-oriented zero where the shooter expects known distances and prioritizes exact point of impact at a reference range, or
(2) a maximum point blank range (MPBR) zero/Hold Dead-On Zero is where the shooter prioritizes keeping impacts within an acceptable zone over the widest possible distance with minimal hold or adjustment.
Note:
Maximum Point Blank Range (MPBR) is the farthest distance at which you can aim at the center of a target and keep bullet impact within a predefined acceptable vertical deviation—based on target size—without adjusting for elevation.
Once the bullet’s trajectory exceeds that allowable deviation, you are outside of your MPBR and can no longer hold center.
If your target has a 6-inch vital zone, your allowable vertical deviation is ±3 inches from point of aim. MPBR is the maximum distance over which the bullet’s trajectory remains within that ±3-inch envelope. Once the bullet drops more than 3 inches below point of aim, you are beyond MPBR and must hold or dial for elevation.
These two zero approaches arise naturally from constraints:
1. Either you optimize zero error at a single reference point, or
2. You optimize maximum allowable deviation over a distance interval.
(1) Known-Distance (Precision) Zero
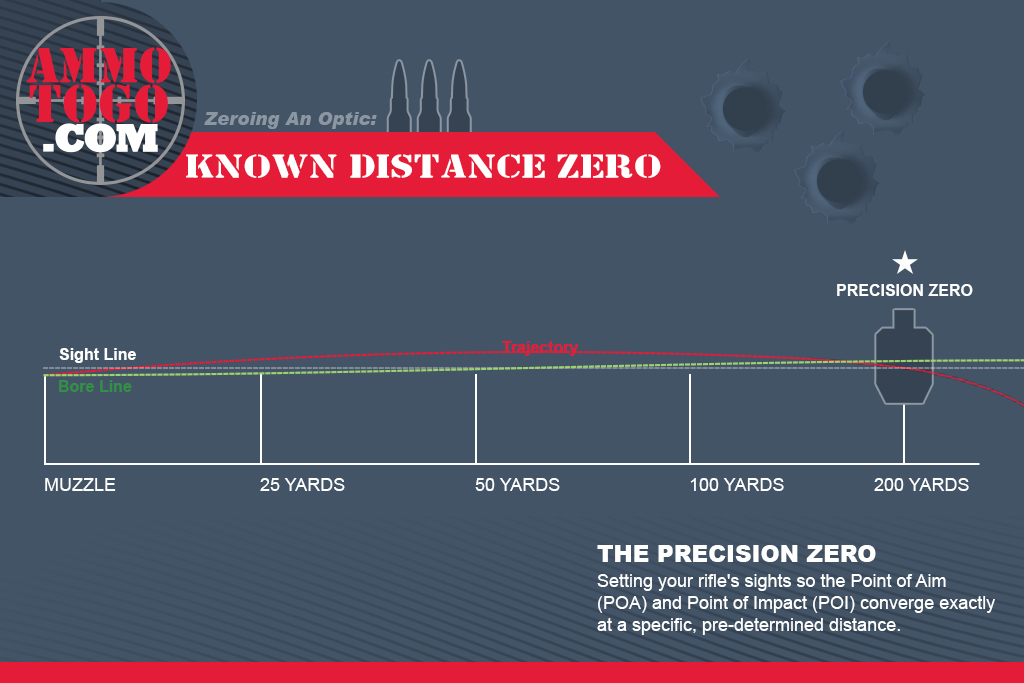
- A zero selected for precision shooting, competition, and known-distance engagements.
- Designed to prioritize repeatability and clean, predictable math at a specific zero distance.
- The shooter is expected to dial or hold elevation for targets both inside and beyond the zero.
- When fundamentals, conditions, and ballistic inputs are correct, this zero allows the shooter to place impacts exactly at the point of aim.
- Emphasizes precision and control over speed and simplicity.
(2) MPBR / Hold-Dead-On Zero (Intent-Driven)

- A zero selected for speed, simplicity, and practical effectiveness, not absolute precision at any single distance.
- The shooter aims center and hits center by keeping the bullet’s trajectory within a predefined vital zone across the widest usable distance range.
- Commonly used on defensive carbines, general-purpose rifles, and many hunting setups.
- Often referred to as a “battle zero” due to its emphasis on rapid engagement with minimal correction.
- Trades exact point-of-aim precision for maximum forgiveness and reduced decision-making.
Factors Affecting Your Rifle’s Zero
Once you have determined what your objective is, your rifle setup will next determine what your optimal zero is. Your barrel length, caliber, barrel quality, optic and optic height are key varying factors in determining your rifle’s optimal zero. I’ll break it down on how and why that’s the case.
Barrel Length
Muzzle velocities vary by barrel length. Bullet speeds typically increase with longer barrels and decrease with shorter barrels. Meaning theoretically, your bullet might lose enough velocity to not even reach your desired target if your target distance is far out of reach.
Caliber
The kind of bullet you shoot also determines how slow, how fast and how flat its trajectory is. If it’s an extremely slow bullet, then you will need to make heavy angular adjustments on your rifle to give it enough time to intersect your line of sight at a given distance.
Barrel Quality
Not all barrels are the same. Differences in manufacturing quality—such as bore uniformity, rifling consistency, chamber alignment, and crown finish—directly affect how consistently a rifle can place shots. Budget-tier barrels tend to produce greater shot-to-shot dispersion, while higher-quality barrels, when paired with suitable ammunition, produce tighter and more repeatable groups.
- Shooters use phrases like “1 MOA gun” or “2 MOA rifle” to describe a firearm’s inherent accuracy potential.
- MOA (Minute of Angle) is an angular measurement, not a fixed distance.
- One MOA equals 1/60th of one degree.
- Because MOA is an angle, the linear distance it represents increases with range.
In practical terms:
- 1 MOA ≈ 1.047 inches at 100 yards (commonly rounded to 1 inch)
- ≈ 2 inches at 200 yards
- ≈ 3 inches at 300 yards
- And so on, scaling linearly with distance
When a rifle is called a 1 MOA gun, it means:
- The rifle can consistently produce ~1-inch groups at 100 yards given all the right conditions
- This describes group size (dispersion), not point-of-impact accuracy.
- MOA therefore defines the practical precision limit of the rifle and shooter system.
- As distance increases, this dispersion sets a hard ceiling on how precise a zero or shooting strategy can realistically be.
Optics
Your optic plays a major role in determining how your rifle should be zeroed. Different optics are designed around different assumptions about distance, speed, precision, and ballistic behavior. Some optics are intentionally flexible, while others are built around factory-calibrated ballistic expectations. Understanding which category your optic falls into is critical, because the “optimal” zero for one optic can be suboptimal—or misleading—for another.
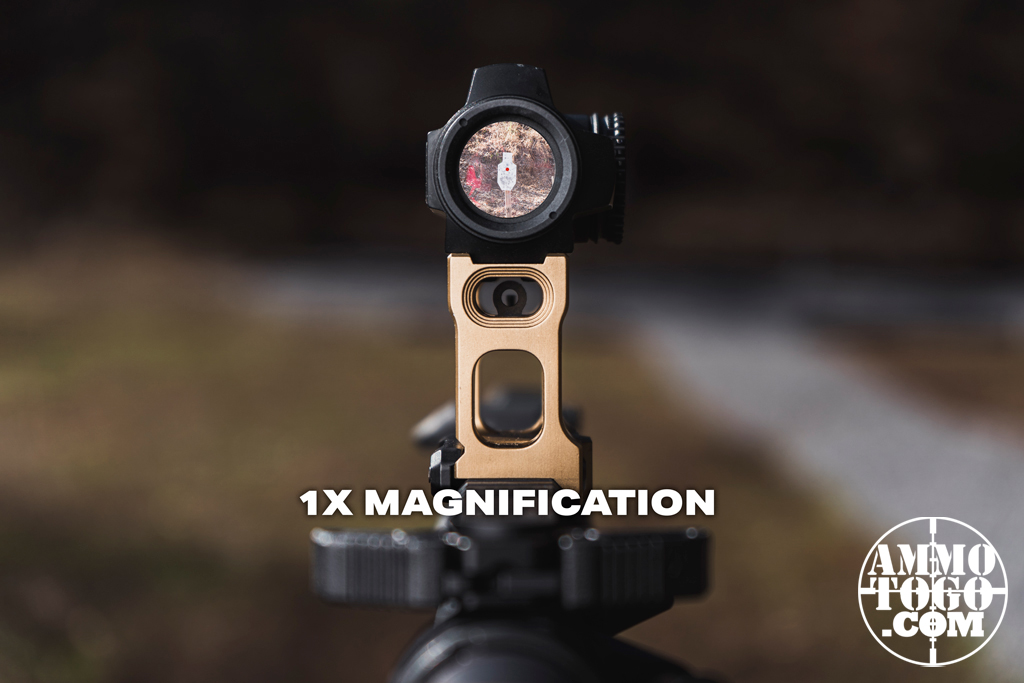
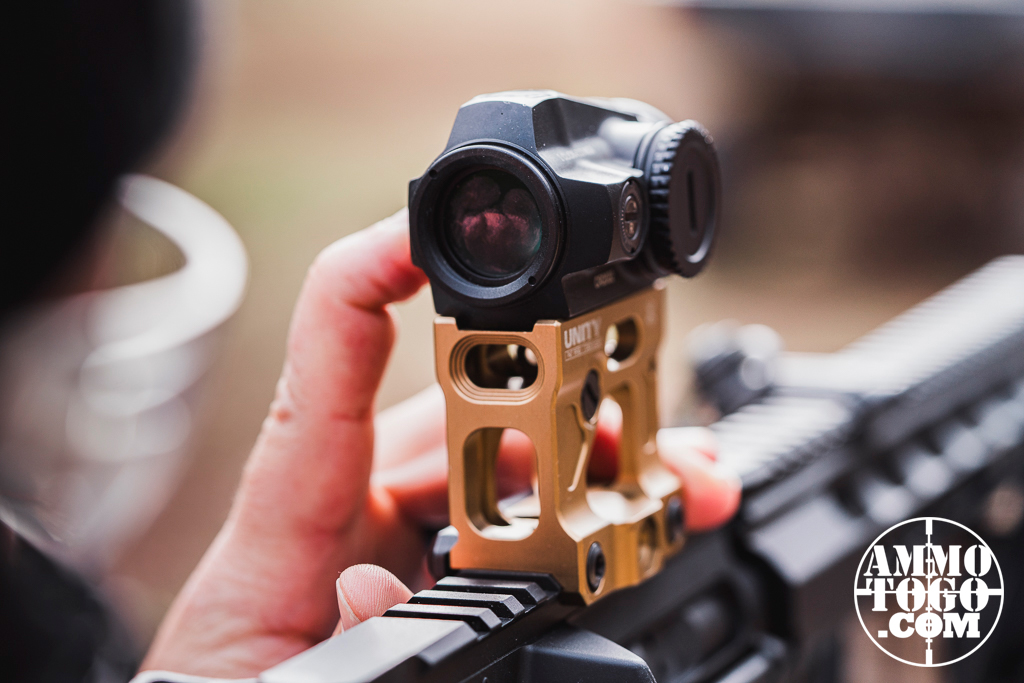
Optic Height
The vertical distance between the optic’s aiming axis and the rifle’s bore axis—has a direct and measurable effect on bullet trajectory and zeroing behavior. While it does not change the ballistic performance of the cartridge itself, it does change how the trajectory intersects the line of sight, which in turn affects near zero, far zero, holds, and MPBR.
How to Sight In a Red Dot
A simple rule worth noting is that single red dot sights have no factory-calibrated ballistic assumptions. They provide a single aiming reference, and all trajectory behavior is defined entirely by the chosen zero and the rifle’s actual ballistics. In other words, the calibration is completely user-defined.
With that freedom, the MPBR / Hold-Dead-On zero is most commonly associated with simple red dot reticles because the optic itself offers no information for distance-based correction. There are no drop marks, no ranging cues, and no angular references intended for dialing or precise holds. As a result, the most effective way to use a red dot is to select a zero that keeps bullet impact within an acceptable target zone over the widest possible distance range without adjustment.
This pairing minimizes cognitive load, reduces the need for range estimation, and aligns with the red dot’s primary strengths: speed, simplicity, and reliability under time pressure or unknown distances.
Adjusting/Dialing Your Red Dot Optic
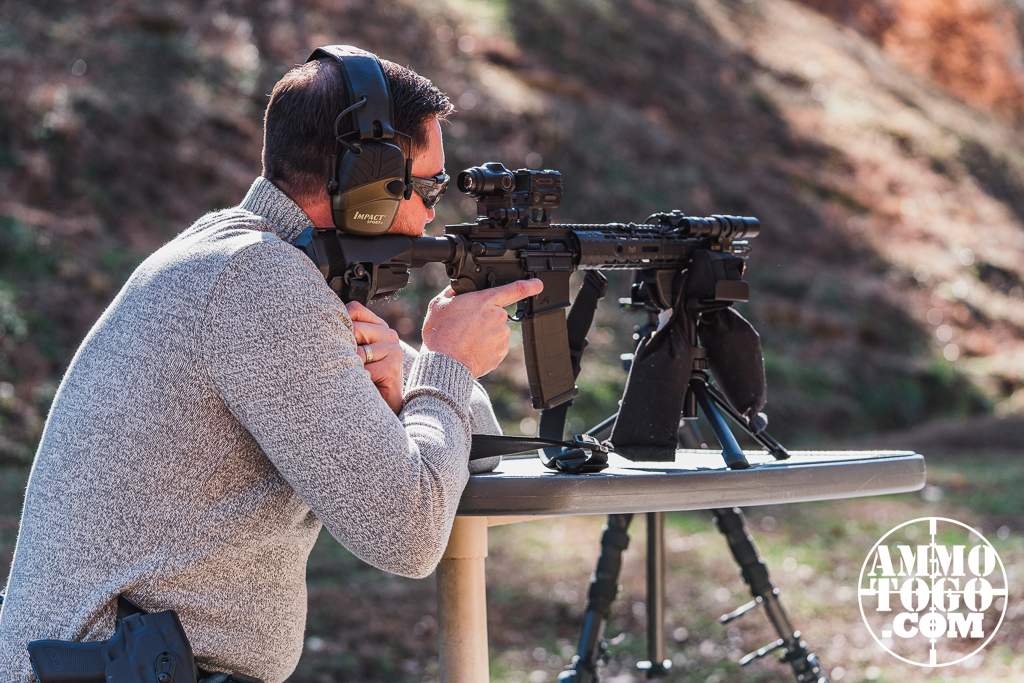
1. Set up your target and distance
- Pick your zero distance (common: 25, 36, 50, or 100 yards).
*Remember: Conventional zeros, when applied to unconventional rifle setups, can produce suboptimal performance.* - Use a stable rest (bags, bipod + rear bag, bench) so you’re not “chasing” wobble.
- Use a simple target with a clear center aiming point.
2. Confirm your optic + ammo basics
- Make sure the red dot mount is tight.
- If your dot has adjustable brightness, set it just bright enough to see clearly (too bright can make the dot “bloom” and hurt precision).
- Use the ammo you actually plan to zero with.
3. (Optional) Get close first
- If you can, bore-sight or visually align the barrel/upper with the target so your first shots are on paper.
4. Shoot a group
- Aim at the exact same point each shot.
- Fire 3–5 rounds (a group, not a single shot).

5. Find the group center
- Ignore the “worst” individual shot and look for the average center of the group.
- Measure how far the group center is from your aiming point: Example: 2 inches low, 1 inch right.
6. Know what you’re adjusting (this is the key)
There are two ways optics describe turret direction:
- Most red dots are “point of impact” adjustments (common phrasing: “UP” moves impact up).
- Some optics describe it as moving the dot.
To keep it simple and avoid confusion, use this rule:
Dial the turret the direction you want the bullet impacts to move.
- Impacts low → dial UP
- Impacts high → dial DOWN
- Impacts left → dial RIGHT
- Impacts right → dial LEFT
(Your optic’s manual should match this. If it doesn’t, do one small test adjustment and confirm which way it moves.)
7. Convert inches to clicks
- First, find your click value: common is 1 MOA/click or 0.5 MOA/click.
- Use these quick references:
100 yards
- 1 MOA ≈ 1 inch
- If 1 MOA/click: 1 inch = 1 click
- If 0.5 MOA/click: 1 inch = 2 clicks
50 yards
- 1 MOA ≈ 0.5 inch
- If 1 MOA/click: 1 inch = 2 clicks
- If 0.5 MOA/click: 1 inch = 4 clicks
25 yards
- 1 MOA ≈ 0.25 inch
- If 1 MOA/click: 1 inch = 4 clicks
- If 0.5 MOA/click: 1 inch = 8 clicks
Example (50 yards, 0.5 MOA/click):
- Group is 2″ low → 2″ ÷ 0.5″ per MOA = 4 MOA → 8 clicks UP
- Group is 1″ right → 1″ ÷ 0.5″ per MOA = 2 MOA → 4 clicks LEFT
8. Dial the turrets
- Elevation is typically the top turret.
- Windage is typically the side turret.
- Count clicks carefully.
9. Confirm with another group
- Shoot another 3–5 shot group.
- Measure again.
- Repeat until the group center is where you want it.
10. (Optional) Re-index turret caps
- If your optic allows it, re-align the turret markings to “0” after you’re zeroed so it’s easier to return later.
How to Sight in a Scope
1) Set up your target and distance
- Choose your zero distance:
- Most scopes: 100 yards
- BDC scopes: use the manufacturer-specified zero (commonly 100 yards)
- Use a stable shooting position (bench, bags, bipod + rear bag).
- Use a target with a clear center aiming point and reference lines.
2) Set up the scope before firing
- Ensure the scope mount and rings are properly tightened.
- Level the rifle and confirm the scope is not canted.
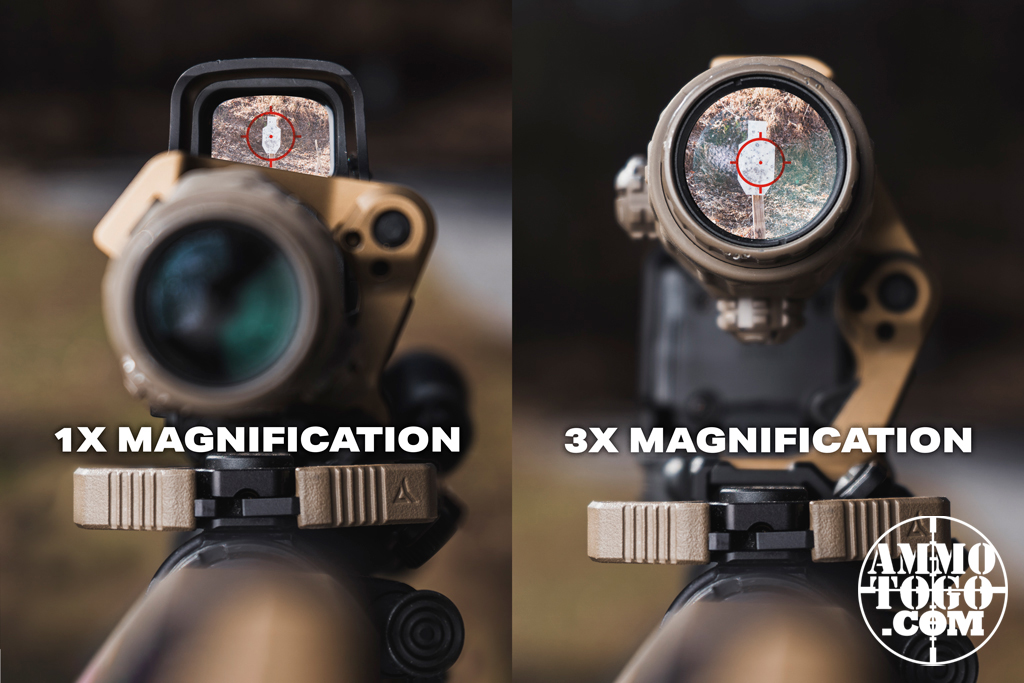
- Set parallax to the target distance.
- Set magnification to mid or high power for precision.
- If illuminated, keep illumination low to avoid reticle bloom.

3) Bore-sight (optional but recommended)
- Bore-sighting is only possible on rifles that allow a clear view down the barrel.
- Bolt-action rifles: remove the bolt and visually center the target through the bore, then adjust the reticle to match.
- AR-pattern rifles: separate upper/lower, remove the bolt carrier group, and visually align the barrel to the target, then adjust the reticle.
- This step only gets you on paper—it does not zero the rifle.
4) Shoot and observe
- Aim at the exact same point for every shot.
- Fire a 3–5 shot group (do not chase single shots).
- Allow the rifle to recoil naturally.
5) Measure the difference
- Identify the center of the group, not the furthest shot.
- Measure how far the group center is from your point of aim. Example: 1.5 inches low, 0.75 inches right.
6) Calculate adjustments
First, confirm whether your scope uses MOA or MIL (MRAD) adjustments.
Elevation (Up / Down)
- Impacts low → dial UP
- Impacts high → dial DOWN
Windage (Left / Right)
- Impacts left → dial RIGHT
- Impacts right → dial LEFT
Always dial in the direction you want the bullet impacts to move.
7) Convert distance to clicks
MOA scopes
- 1 MOA ≈ 1 inch at 100 yards
- Most scopes: ¼ MOA per click
- 4 clicks = 1 MOA
MIL scopes
- 1 MIL = 3.6 inches at 100 yards
- Most scopes: 0.1 MIL per click
- 10 clicks = 1 MIL
Example (100 yards, MOA scope):
- 2 inches low → 2 MOA → 8 clicks UP
- 1 inch right → 1 MOA → 4 clicks LEFT
8) Dial the turrets
- Use the top turret for elevation.
- Use the side turret for windage.
- Count clicks carefully and avoid over-dialing.
9) Confirm
- Fire another 3–5 shot group.
- Measure again.
- Repeat adjustments until the group center matches your point of aim.
10) Reset turrets / set zero stop (if equipped)
- Once zeroed, reset turret caps to “0.”
- Set the zero stop if your scope has one.
- This allows you to dial for distance and return to zero reliably.
11) Using reticle hashes instead of dialing
- Most scopes have MOA or MIL hash marks in the reticle.
- Instead of dialing, you can hold using the reticle. Example: target requires 1.2 MIL of drop → hold 1.2 MIL low.
- Holding is faster; dialing is more precise.
12) Using BDC reticles
BDC reticles are calibrated for:
- A specific cartridge
- A specific muzzle velocity
- A specific barrel length
- A specific zero distance
- A specific magnification
- Zero exactly as the manufacturer specifies.
- Use BDC hashes for their labeled distances (300, 400, 500 yards, etc).
- If your setup differs, expect BDC marks to be approximate, not exact.
13) Final check
- Confirm zero at your primary distance.
- Dial up and return to zero to verify tracking.
- Ensure impacts consistently return to the same point.
MPBR and Near-Zero
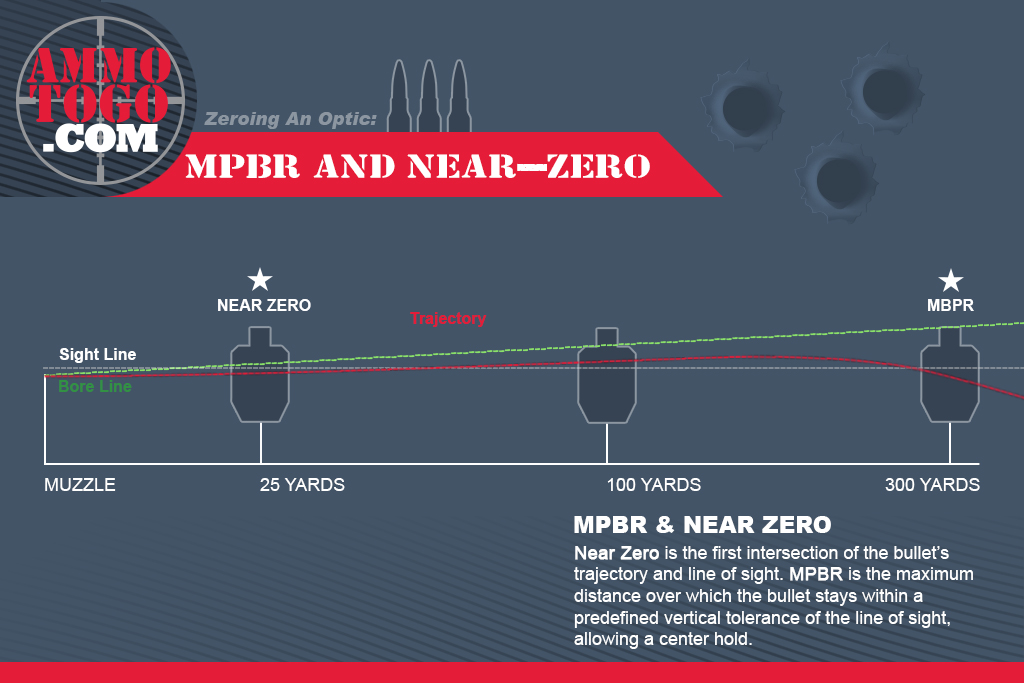
So here’s where the rubber meets the road. In order to achieve acceptable hits out to your max point blank range, you need to somehow figure out what your nearest distance is to sight in your rifle. Remember, your muzzle velocity, barrel quality and length, and optic height will critically inform your near zero and MPBR.
You’re probably saying to yourself, “this is way too much trouble for a simple zero.” I agree. It is a ton of information to factor in. But we’re not trying to give you some basic zero. We want shooters to perform at optimized skill levels and that requires an Optimal Zero. We’re assuming you don’t have the backing of uncle sam to resupply you with tax subsidized ammo every time your ammo supply runs dry, plus the unlimited energy reserves to run up and down the range to confirm your zeros.
The wrong near zero with your red dot could produce such massive deviations that you might undershoot or entirely overshoot some targets ranging from your muzzle and all the way out to distance. That’s an unacceptable and useless setup and can lead to unacceptable misses, especially under stress. We’re aiming to give you a zero that produces the flattest and most forgiving trajectory out to its furthest capable distance before the bullet begins to drop.
Conventional Zeros
Historically, when it came to zeroing an AR15, you would use military conventional zero distances like 25/300 meters, 36/300 yards, and 50/200 yards. These are often called fixed zeros. They were not chosen because they are universally optimal, but because they were optimized around a specific set of assumptions.
Those assumptions came from military doctrine built for standardized service rifles such as the M16 and M4—known barrel lengths, predictable muzzle velocities, low or fixed sight heights, and defined engagement envelopes. Within that controlled context, these zeros were practical and effective.
Modern rifle setups look very different. Shorter barrels, suppressed systems, non-standard configurations, and taller optic heights are now common, driven by use cases spanning CQB to general-purpose roles. These setups fall outside the original assumptions conventional zeros were designed around.
When applied unchanged to these modern configurations, conventional zeros often produce suboptimal results: reduced maximum point-blank range, increased reliance on mental holds at common distances, and a trajectory that no longer aligns with how the rifle is actually used.
Conventional Zero Assumptions
Conventional zeros are assumption-dependent. Change the rifle, and the zero must change with it.
25 / 300 m Zero
Assumes: a 20″ service rifle firing M193/M855 at ~3,100 fps, using iron sights or very low sight heights. It tolerates significant midrange rise and prioritizes distance over precision, with acceptable deviation based on torso-sized targets rather than small vital zones.
36 / 300 yd Zero
Assumes: a 16–20″ rifle with high muzzle velocity, low optic height (~1.4–1.5″), and a predictable arc that peaks high mid-flight. It accepts hold-under at common distances and was designed around long-range alignment, not midrange simplicity.
50 / 200 yd Zero
Assumes: a 14.5–16″ carbine, ~2,800–3,000 fps muzzle velocity, and a low-mounted optic. The trajectory is expected to stay within ±3″ from muzzle to ~200 yd, allowing continuous “hold center, hit center” shooting with minimal mental math.
100 yd Zero
Assumes: deliberate, known-distance shooting with a magnified optic. MPBR is not optimized; the shooter is expected to dial or hold for elevation at all distances outside the zero.
Why These Assumptions Matter
Once barrel length, velocity, optic height, target size, or engagement priorities change, these assumptions break. When that happens, the zero no longer behaves as intended—MPBR shrinks, holds increase, and simplicity is lost.
Conventional Zero + Unconventional Rifle
Example: 11.5″ 5.56 with a 36/300 Zero (2.26″ Optic Height) & Simple Red Dot
The 36/300 zero was designed around full-length rifles, high muzzle velocity, low sight height, and torso-sized targets. When applied to an 11.5″ rifle with a tall optic, those assumptions no longer hold.
With reduced velocity and increased optic height, the bullet must launch at a steeper angle to intersect the line of sight. The result is an exaggerated arc that climbs well above the acceptable hit zone through most of the rifle’s realistic engagement distances.
Instead of maintaining a continuous “hold center” window, the shooter is forced to change elevation holds repeatedly:
- Inside 36 yards: hold high to account for mechanical offset
- ~36–70 yards: hold center (the only intuitive distance band)
- ~70–200 yards: hold under, often by 4–8 inches
- ~200–250 yards: reduce hold-under as the trajectory descends
- ~260–280 yards — transition hold (Bullet passes back toward line of sight; shooter must adjust timing and amount of correction.)
- ~300 yards: hold over. Reduced velocity causes the bullet to arrive low at the theoretical far zero.
That is six distinct elevation holds across common distances.
This completely defeats the purpose of a doctrine-based zero. Maximum point-blank range is fragmented, distance estimation becomes mandatory, and the shooter must perform constant mental math instead of relying on a simple, repeatable hold.
In short, that conventional zero no longer simplifies shooting—it adds cognitive load at exactly the distances where simplicity matters most. Such is the case with many setups.
AR Rifle Zero Tool
As you can see, conventional zeros don’t always pair well with unconventional setups. So you’re probably asking, “how can I determine my optimal zero if I have an unconventional setup?” In reality, while it can be calculated, doing so requires ballistic modeling and complex math that is impractical to perform manually. So what’s the solution? Because modern rifle setups make traditional zeroing guesswork, we built the AR Rifle Zeroing Tool to calculate the complex physics and geometry that determine your optimal zero—something the average shooter can’t realistically solve by hand. Let us know what you think. If you have any questions or feedback regarding the tool, email [email protected].